
Amanda Chou
Thursday, November 27, 2025 | 5 分鐘
Nuxt
Nuxt3
Nuxt 前端,整合 Net 後端全站開發筆記
專案準備
git clone
手動指令安裝 pnpm
安裝相依套件:pnpm install
建立正式編譯檔:pnpm run build
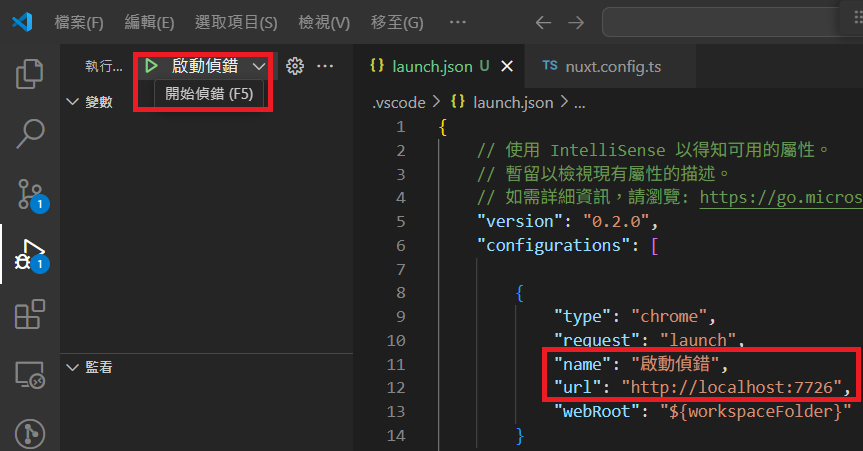
啟動開發伺服器:pnpm run dev
pnpm啟動完畢

專案設定的 url 是

設定完畢後,pnpm run dev 開發伺服器完畢,可使用F5 啟動偵錯
測試帳號準備與登入
檔案結構目錄
共同開發說明>開發注意事項>前端開發>檔案結構目錄
撥空了解 Nuxt 結構目錄
https://clairechang.tw/2023/07/07/nuxt3/nuxt-v3-directory-structure/
請深入閱讀必要了解項目
pages/、layouts/、components/→ 頁面結構與 UI 組合composables/→ 邏輯封裝、狀態管理plugins/、middleware/→ 應用啟動與權限控制stores/→ 使用 Pinia 管理狀態
檔案結構目錄-components
component/{pages Name}
作為子元件與父元件 ( pages.vue ) 溝通使用
抽離元件邏輯,避免 pages/{router}/{subRouter}.vue 理由: 行數過多不好閱讀: SOLID 的第一條,SRP ,一個模組不應處理過多事情
頁面可以精簡僅負責整合 api 回傳與 UI 顯示、
pages/*.vue行數控制在 300 行以內。api/{controller}.vue 也同理,若 api/{controller}.vue 過長、須同步考慮是否後端 controller.cs 處理太多事情
複用相同 ui 邏輯: 理由: dont repeat youself
有依賴父元件 ( pages.vue ) function 互動邏輯時
頁面有細部排版需求
components 就像 net partialView,具備堆疊、組合、嵌套、調整顯示順序的彈性
當畫面結構需要大幅調整,或同一區塊需呈現多種排版以供比較時,將內容拆分為可重組的元件會遠比操作整段
`更靈活高效 這種元件化思維有助於快速實驗、比對設計方案,也大幅提升視覺邏輯的可控性與維護速度。
ex: components\Menu\settingMenu.vue
component/Common
- 複用相同 ui 邏輯
- 不依賴外部 function 互動邏輯時,公用元件
- 定義泛用 props 或 interface 定義在 component/types/{componentName}.ts
- ex: staticTable 靜態顯示列表、model 頁面跳出視窗、LoadingSendBtn 防止重複送出按鈕
檔案結構目錄-pages
Vue 專案都需要路由配置,但 Nuxt 卻沒有,是因為底層已經自動整合 Vue Router,依照資料夾以及檔案結構配置路由,所以更需要小心,在 pages 項下不可以有非路由的當案存在。
- 自動路由
pages/{router}/{subRouter}.vue ex: /customer/index.vue、 /customer/GetAll.vue
- 動態路由
pages/{router}/[dynamicRouter].vue ex: /customer/[CarNo].vue
- 避免有非路由元件存放在 pages
- 自動路由污染:
pages/customer/CustomerMenu.vue,Nuxt 就會產生一個/customer/customerMenu的路由,意味著 search engine 可能 index 到這些元件的空白頁,徒增有安全隱患 。 - 破壞專案結構的可預期性: 預期:
pages/是 route,components/是元件,把 component 放在pages/,會讓新進開發者搞不清楚這個檔案的用途,是 route 還是 UI 片段。
- 自動路由污染:
api 開發 溝通後端
LineCRM.CarCare\StoreWeb\api\login.ts
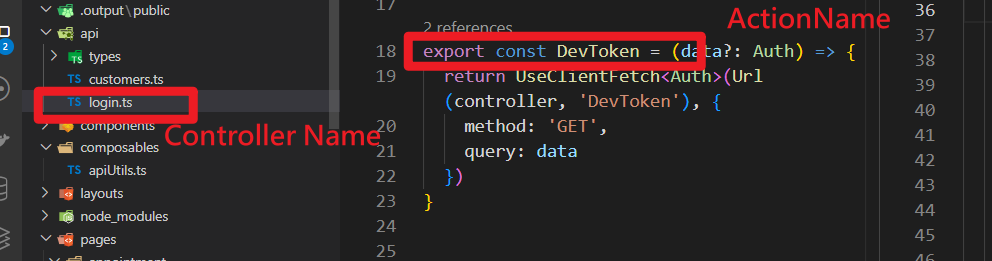
詳閱: 共同開發說明>開發注意事項>共同注意事項>api 開發規範,注意檔案、function 有命名規範。
api 連線
有三種方式
api 連線實體 server : localhost
StoreApi
target: ‘http://localhost:5128’,
api 連線實體 server : Container
carcare-storeapi-web-ui-dev
target: ‘http://192.168.100.41:7728’,
api 連線 mock : postman mock
mockStoreApi
target: “https://64680c7d-60de-4ffe-abb7-462f3958d8df.mock.pstmn.io”,
api 連線實體 server : localhost
本地 api 要 run 起來,連線 localhost 測試來進行前端開發
LineCRM.CarCare\StoreWeb\nuxt.config.ts
target: ‘http://localhost:5128’,
nitro: {
    devProxy: {
      '/storeApi': {
        target: 'http://localhost:5128',
        changeOrigin: true,
        secure: false,
      },
api 連線實體 server : Container
LineCRM.CarCare\StoreWeb\nuxt.config.ts
target: ‘http://192.168.100.41:7728’,
nitro: {
    devProxy: {
      '/storeApi': {
        target: 'http://192.168.100.41:7728',
        changeOrigin: true,
        secure: false,
      },
api 連線 mock : postman mock
模擬資料建立
api 執行 url 參數多一個 ismock true
return UseClientFetch(Url(controller, 'LineAuth'), {
    method: 'GET',
    query: data
  })
//改成
return UseClientFetch(Url(controller, 'LineAuth',true), {
    method: 'GET',
    query: data
  })
前端開發 Api 溝通測試
登入 Postman 查看需要對接的後端 api 與查看回傳參數
api 開發範例
api function call 開發使用參考
共同開發說明>開發注意事項>前端開發>api 開發範例
LineCRM.CarCare.StoreWeb\api\customers.ts 命名方式 LineCRM.CarCare.StoreWeb\api[ControllerName].ts 回傳需打包 apiServiceResult authorization 不需要傳入,只要有正常走登錄流程,authorization 在 apiInterceptor 會處理好驗證問題
SendRequest await 命令式同步處理/非同步處理
LineCRM.CarCare.StoreWeb\pages\customer\index.vue GetCustomersDemo1
// api\customers.ts
export const GetAll = () => {
  const result = SendRequest<apiServiceResult<CustomerRow[]>>(
    Url(controller, 'GetAll'),
    {
      method: 'GET',
    }
  )
  return result;
}

// pages\customer\index.vue

// await 命令式同步處理
// eslint-disable-next-line @typescript-eslint/no-unused-vars
async function GetCustomersDemo1() {
  try {
    const customersResult = await GetAll();
    console.error(customersResult.Data);

  } catch (err) {
    console.error('GetAll catch error:', err);
  }
}

// await 命令式非同步處理
// eslint-disable-next-line @typescript-eslint/no-unused-vars
async function GetCustomersDemo0() {
  try {
    const [res1, res2, res3] = await Promise.all([
      GetAll(), GetAll(), GetAll(),
    ]);
    return {
      a: res1, b: res2, c: res3,
    };
  } catch (err) {
    console.error('錯誤:', err);
    throw err;
  }
}

// SendRequest Promise 鍊式同步處理
async function GetCustomersDemo2() {
  Query().then((res) => {
    if (res.Success) {
      message.success('Success');
      console.error(res.Data);
    } else {
      console.error('GetCustomers Get Fail', res);
    }
  }).catch((err) => {
    console.error('GetCustomers catch', err);
  });
}
alias 版本差異點
Nuxt 3 預設 alias (官方)
jsonCopyEdit{
  "~": "/<rootDir>",
  "@": "/<rootDir>",
  "~/assets": "/<rootDir>/assets",
  "~/components": "/<rootDir>/components",
  "~/composables": "/<rootDir>/composables",
  "~/layouts": "/<rootDir>/layouts",
  "~/pages": "/<rootDir>/pages",
  "~/plugins": "/<rootDir>/plugins",
  "~/public": "/<rootDir>/public",
  "~/server": "/<rootDir>/server",
  "~/store": "/<rootDir>/store"
}
Nuxt 2 預設 alias
jsonCopyEdit{
  "~~": "/<rootDir>",
  "@@": "/<rootDir>",
  "~": "/<rootDir>",
  "@": "/<rootDir>",
  "assets": "/<rootDir>/assets",
  "public": "/<rootDir>/public"
}
npx nuxi init StoreWeb
npx nuxi init CustWeb npx nuxi init PortalWeb
npx nuxi init ITSMobileCare
npx nuxi@latest devtools enable
pnpm install -D tailwindcss postcss autoprefixer

# 如果是用 npm 的話
npx tailwindcss init -p

# 如果是用 pnpm 的話(不能 npx 直接執行,安裝路徑都不一樣)
pnpm install -D tailwindcss-cli
pnpm exec tailwindcss-cli init -p
要自訂 Nuxt 配置? 編輯 nuxt.config.ts
要加入 API? 在 server/ 內新增 .ts 文件
要加入全局 CSS? 編輯 app.vue 或 nuxt.config.ts
要加入靜態資源? 放在 public/ 目錄內
fetch
onResponseError
$fetch().onResponseError 是攔截器使用方式
後端沒有設定好,就可能造成解析失敗,畫面整格卡住
前端 try/catch err 也沒有用、onResponseError
回應資料格式問題與傳輸機制(chunked)
return context.Response.WriteAsync("{\"error\":\"Unauthorized\"}");
使用 chunked transfer encoding,會導致前端 $fetch:收不到正確結尾(chunk 結束符),或無法確定資料完整性,進而跳過錯誤攔截
設定 Content-Length,以避開 chunked 傳輸
var result = new { error = "Unauthorized" };
context.Response.ContentType = "application/json";
var bytes = Encoding.UTF8.GetBytes(JsonSerializer.Serialize(result));
context.Response.ContentLength = bytes.Length;
return context.Response.Body.WriteAsync(bytes, 0, bytes.Length);
Content-Length明確 ,就不會是 chunked 傳輸Content-Type明確,避免前端 parse 失敗- 確保所有內容在一次完整回應中寫入 $fetch.onResponseError 能觸發
Chunked 傳輸原理(HTTP/1.1)
沒設 Content-Length,預設 chunked reponse header 會有 Transfer-Encoding: chunked 資料分成多段回傳(每段前加長度),沒有 Content-Length,必須依 chunk 結尾(0\r\n\r\n)判斷結束
chunked 結尾不能手動設定,是 HTTP 協議層自動處理的機制,不是應用層能控制的。
在 chunked 傳輸中,每個區塊格式為:
php-templateCopyEdit<chunk-size-in-hex>\r\n
<data>\r\n
資料結束標記為:
CopyEdit0\r\n
\r\n
這整個流程是由 ASP.NET Core 或 Kestrel(或 IIS)在輸出流結束時自動加上去的。
Api 風格
Promise.then() → 鏈式/宣告式(chaining / declarative)
// Promise 鍊式同步處理
async function GetCustomersDemo2() {
  GetAll().then((res) => {
    if (res.Success) {
      message.success('Success');
      console.error(res.Data);
    } else {
      console.error('GetCustomers Get Fail', res);
    }
  }).catch((err) => {
    console.error('GetCustomers catch', err);
  });
}
async/await → 命令式/同步風格(imperative / synchronous-like)
// await 命令式非同步處理
async function GetCustomersDemo0() {
  try {
    const [res1, res2, res3] = await Promise.all([
      GetAll(), GetAll(), GetAll(),
    ]);
    return {
      a: res1, b: res2, c: res3,
    };
  } catch (err) {
    console.error('錯誤:', err);
    throw err;
  }
}

// await 命令式同步處理
async function GetCustomersDemo1() {
  try {
    const customersResult = await GetAll();
    console.error(customersResult.Data);

  } catch (err) {
    console.error('GetAll catch error:', err);
  }
}
build Image
Nuxt 專案需要 build image 的 Dockerfile 是 SSR
依賴 pnpm 安裝
run port 2677
需要 nginx 代理後端 http://localhost:2677/storeApi 要導向 http://192.168.100.41:7728
http://localhost:2677/storeApi/Login/Auth 要導向 http://192.168.100.41:7728/Login/Auth
建立 API
- 在
server/目錄建立 API,Nuxt 會依據資料夾結構自動生成 API 路徑 - 使用
defineEventHandler()建立事件處理器
範例檔案結構:
server/
|—— api/
  |—— hello.js
|—— routes/
  |—— hello.js
放置於 /server/api 下的檔案,依據檔案名稱產生 /api 前綴路徑(/api/hello),如果不想加上 /api 前綴,將檔案放置於 /server/routes 即可
不論副檔名為
.js、.ts,均依據檔案名稱產生 API 路徑
**範例:**新增 /api/hello API
// server/api/hello.js
export default defineEventHandler(() => 'Hello World!');
接著在瀏覽器開啟頁面
HTTP Methods
Server API 預設請求方法為 get,如果要調整其他方法 post、patch、delete,加在檔名後綴即可
server/
|—— api/
  |—— user.post.js
  |—— user.delete.js
**範例:**新增 /api/user API,並使用 post 方法
Nitro 搭配 unjs/h3 來建立 Server API,
readBody()為 unjs/h3 提供的 utilites,用來取得 request body,其他 utilites 可以參考 官方文件
// server/api/user.post.js
export default defineEventHandler(async event => {
  const body = await readBody(event);
  return { ...body };
});
在頁面使用 Nuxt3 useFetch 方法發出請求(useFetch 參考文章)
// pages/index.vue
<template>
  <div>
    <div>name: {{ user.name }}</div>
    <div>age: {{ user.age }}</div>
  </div>
</template>

<script setup>
const { data: user } = useFetch('/api/user', {
  method: 'post',
  body: {
    name: 'Daniel',
    age: 18
  }
});
</script>
捕捉所有路由(Catch-all Route)
透過檔名 […] 來捕捉未被定義的 API 路徑(fallback route)
範例檔案結構:
server/
|—— api/
  |—— hello.js
  |—— [...].js
透過 createError() 方法來處理錯誤
// server/api/[...].js
export default defineEventHandler(() => {
  throw createError({
    statusCode: 404,
    statusMessage: 'API Path Not Found'
  })
});
當我們向未定義的路由發出請求,例如 /api/nothing
// pages/index.vue
<template>
  <div>
    error:
    <pre>{{ error.data }}</pre>
  </div>
</template>

<script setup>
const { error } = useFetch('/api/nothing');
</script>